Update October 2023*
Let's start from the beginning.
All Bluetooth intercom devices require adaptation for assembly, they are not built or tested on all helmet models, whether jet, modular or full-face. They are basically standard and adapt to all helmet models. Very often we hear complaints about audio performance. It all depends solely on the assembly. * After 18 years of experience in the sector and thousands of installations and revisions I can assure you that a good installation solves 95% of all audio problems.
Initial check before fitting the intercom to the helmet.
Not all motorcycle helmets are well designed to mount a Bluetooth intercom, even if they have the provision it does not necessarily mean it is in the right place.
Let's see why and the factors that negatively influence assembly:
A motorcycle helmet is basically made up of three main components, external shell , internal shell and lining .
External shell: the container casing of the other 2 components, the new regulations require that for every two measurement sizes the shell is larger, this to maintain the thickness dimensions of the internal shell.
Inner shell: The internal lining in pressed polystyrene is basically the part that saves our lives. It also has various measurements compared to the sizes.
Lining: The fabric part that makes the helmet comfortable, which is in direct contact with our head.
Unfortunately, we very often find that many helmet models are designed to contain a Bluetooth intercom efficiently only on a series of sizes, such as ML which are classically the best-selling ones. But we also verify that many helmet models are poorly designed in all sizes.
We also add that not all heads are the same, regardless of size or measurements, large ears, small ears, elongated head, round head, etc. etc.
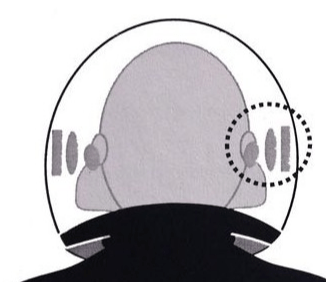
Preliminary check for speaker placement.
This check is the most important, as perfect assembly has multiple advantages for operation:
- Lower listening volume, consequently less battery consumption, better audio quality at high speeds.
- Reduction of external noise, prevents annoying aerodynamic noises and makes travel more comfortable.
Verify:
- Put the helmet on in the riding position (the position that you think is the most similar to your riding style).
- Insert your index finger between the helmet and your head, at ear level.
- Place the pad of your index finger inside your ear.
- Then, without moving your hand and finger, flex your index finger from the nail side towards the helmet, press hard on the padding so as to leave a mark. That's where you mount the speakers.
Regardless of whether it is inside the setup or not, the speakers must be positioned there. If you are buying a new helmet, check this important parameter before choosing the model.
Check assembly:
Once the position of the speakers has been marked, another main factor is the distance between the earphone and the ear, the closer it is the better it performs. * An acceptable distance is 5mm but if you can position it at 2/3mm it would be optimal.
In most Bluetooth intercoms, spacers are provided to be able to bring the speakers closer to the ear.
Spacer bearing assembly diagram.
In the event that the positioning of the speaker is not in the preparation but in the padding, it is sufficient to make a small incision at the base of the padding, remove a small layer of sponge, equal to the thickness of the speaker, once positioned place two points with needle and thread to close the opening. The speaker will remain stationary inside the seat you have created.
In other cases, if the position of the speaker is between the padding and the predisposition, it will be sufficient to make the incision, remove all the sponge that prevents assembly, place the excess fabric on the base of the helmet, gluing it with fabric glue, then position the speaker, always checking that it is not too far from the ear.
* We often find the provision built into the shell inside the helmet, the most common mistake is to insert the speaker directly inside the provision, without taking into account the distance that separates the speaker from the ear. Check that the speaker setup is not covered by padding or cloth flaps, even if they are made of thin material or perhaps perforated they reduce the audio performance by up to 50% (if the speaker remains within the tolerance of the distance from the ear) , definitely superior if it is far from the ear.
* If there is part of the padding or flaps of fabric, proceed as follows: take some double-sided tape, shape it so that it can enter the speaker preparation, apply it inside the preparation and then press the flap of fabric or the padding to the inside the setup. In this way we would have the flap of fabric firmly attached to the helmet so it will be possible to put the Velcro© with adhesive to position the speaker. THE FRONT SPEAKER MUST ALWAYS BE FREE WITHOUT OBSTRUCTIONS .
Summary:
- Speaker mounted in front of the ear.
- Speaker mounted as close to the ear as possible.
- Speaker must not have any obstructions in front, it will affect the audio quality.
Difficulty transmitting Bluetooth pilot passenger or conference (microphone)
- Check that the microphone is oriented correctly towards your mouth.
- Check that the distance is not more than 2cm.
- * The new models have more settings for adjusting the microphone sensitivity, there is no precise rule for their setting, you just need to try the best setting.
- * Some helmet models (even prestigious ones) produce resonances inside the shell, which can accidentally activate voice commands or other intercom functions. In this case, if adjusting the microphone levels via the APP has not solved the problem, try changing the position of the microphone or placing a very large sponge.
Background noise during transmission.
- The above checks apply.
- Jet or modular helmet, replace the sponge with a high density one
- Full face helmet, replace the microphone with the arm one and if necessary also the sponge.
Why do we have to mount a boom microphone and not the wired one on the full-face helmet?
- Again due to the problem that all helmets are not the same, it is possible to own a helmet that has a considerable distance between the mouth and the chin guard, in this case the microphone reception will be inefficient. By mounting a boom microphone, once the helmet is on we would be able to bring it closer to our mouth.
Problems with Bluetooth intercom voice commands.
Most problems are caused by the microphone and its mounting, read the guide above.
Another cause, the most common, is inherent to the pronunciation of commands, they must be pronounced correctly in the set language, dialect cadences and/or abnormal tones are not recognised.

